Step by Step RAG
This is a technical post about implementing retrieval augmented generation (RAG) for LLMs. It's intentionally high level and doesn't get into all the details and possibilities.
The Problem
Using Letta for answering questions and walking me through cooking has been great. However, my experience using Claude Sonnet and other LLMs for general information retrieval has been not-so-great.
I am consistently getting technical answers that are out of date at best, and include hallucinations at worst. This can range from getting various parameters and environment variables wrong, to creating entirely new frameworks (complete with code samples!) on the fly. To avoid hallucinations, the LLM needs external data to ground it.
For most people, using a solution like NotebookLM, RagFlow, R2R, or kotaemon is perfectly sufficient, and I have not gone through all the possible options on RagHUB. But I have a specific problem: I want all the AWS documentation to be available and citable by Letta. All of it.
Starting with RAG
Retrieval augmented generation (RAG) happens when an LLM retrieves data as part of its response. Although RAG is commonly associated with databases and document stores, it could be any tool that returns additional data to be incorporated in the response. For example, Letta uses Tavily to search when it doesn't have the answer, which it has used to look up knife skills and expiration dates on food.
Got a tool that runs ripgrep against your github repo? It's RAG. Got a tool that pings n8n to query Google Sheets? Also RAG.
So in this case, we want to make a tool available to Letta that does a semantic search on AWS documentation. We don't tell Letta how this happens: we want Letta focused on the domain and we want to include best practices for tool calling.
Here's what the tool looks like:
import requests

def query_aws_documents(question: str):
    """
    What this tool does
    ----------

    Calling this tool sends a question to an agent that specializes in AWS documentation and will answer to the best of its ability.

    When it should be used
    ----------

    Use this tool when you are asked an AWS specific question by a user to provide additional context and check your answers.

    Important caveats or limitations
    ----------

    The AWS agent is very specific and will not infer or suggest additional options.  It can retrieve information, but it is not very creative.

    Parameters
    ----------
    question: str
        The question to ask the AWS agent about documentation.

    Returns
    -------
    answer: str
        The answer to the question.
    """

    response = requests.post(
        "http://devserver:1416/query_aws_docs/run",
        json={"question": question},
    )
    return response.json()["result"]
That's the whole thing. Keep it simple, keep it focused, keep it isolated. This approach means that if I want to set up an MCP server with Claude Desktop or Cline, I can do so without any problems.
Querying the AWS Documentation
Now we have the question of what is on the other end of that HTTP request. You do have the option of using a remote RAG system like Vectorize or Vectara – I want the full end-to-end RAG experience, so I'm using HayHooks, a REST API server for Haystack. Haystack has been good quality to work with: documentation is solid, the design is logical, and it has excellent logging options.
HayHooks has a query pipeline that puts together the components needed for retrieval. The example they give uses ElasticSearch, but you can start off with a pipeline template.
The implementation of the pipeline is hidden from the tool. I could be directly pasting a document into Gemini 2.0 Flash Lite and leveraging the 1M token context window, and it would still be RAG as long as it was the pipeline doing it. Unfortunately, the AWS documentation is too large to fit in a single context window, so we need to start looking at more complex solutions. This is where we start getting into what people traditionally think of as RAG, also known as "making your own bespoke semantic search engine."
Most RAG solutions typically using a hybrid approach with keyword search combined with a semantic search implemented through embedding. There is a huge amount of change going on, and just reviewing 2024 is enough to realize that no matter what solution you use, it's going to be out of date in a year.
I'm starting simple. Here's the pipeline wrapper I'm using:
class PipelineWrapper(BasePipelineWrapper):
    def create_pipeline(self) -> Pipeline:
        text_embedder = get_text_embedder()
        retriever = get_retriever()
        prompt_builder = get_chat_prompt_builder()
        chat_generator = create_chat_generator()

        query_pipeline = Pipeline()
        query_pipeline.add_component("embedder", text_embedder)
        query_pipeline.add_component("retriever", retriever)
        query_pipeline.add_component("prompt_builder", prompt_builder)
        query_pipeline.add_component("llm", chat_generator)
        query_pipeline.connect("embedder.embedding", "retriever.query_embedding")
        query_pipeline.connect("retriever", "prompt_builder")
        query_pipeline.connect("prompt_builder.prompt", "llm.messages")
        return query_pipeline

    def setup(self) -> None:
        self.pipeline = self.create_pipeline()

    def run_api(self, question: str) -> str:
        log.trace(f"Running pipeline with question: {question}")
        result = self.pipeline.run(
            {
                "embedder": {"text": question},
                "prompt_builder": {"question": question},
            }
        )

        return result["llm"]["replies"][0].text
There's just four things in the pipeline: the embedder, the retriever, the prompt builder, and the LLM. The embedder takes the question and turns it into an embedding. The retriever takes the embedding and returns a list of documents. The prompt builder takes the question and the documents and turns it into a prompt. And finally, the LLM takes the prompt and returns a response.
Fortunately, you don't need to imagine what the pipeline looks like. HayHooks has a Swagger UI that has a draw route.
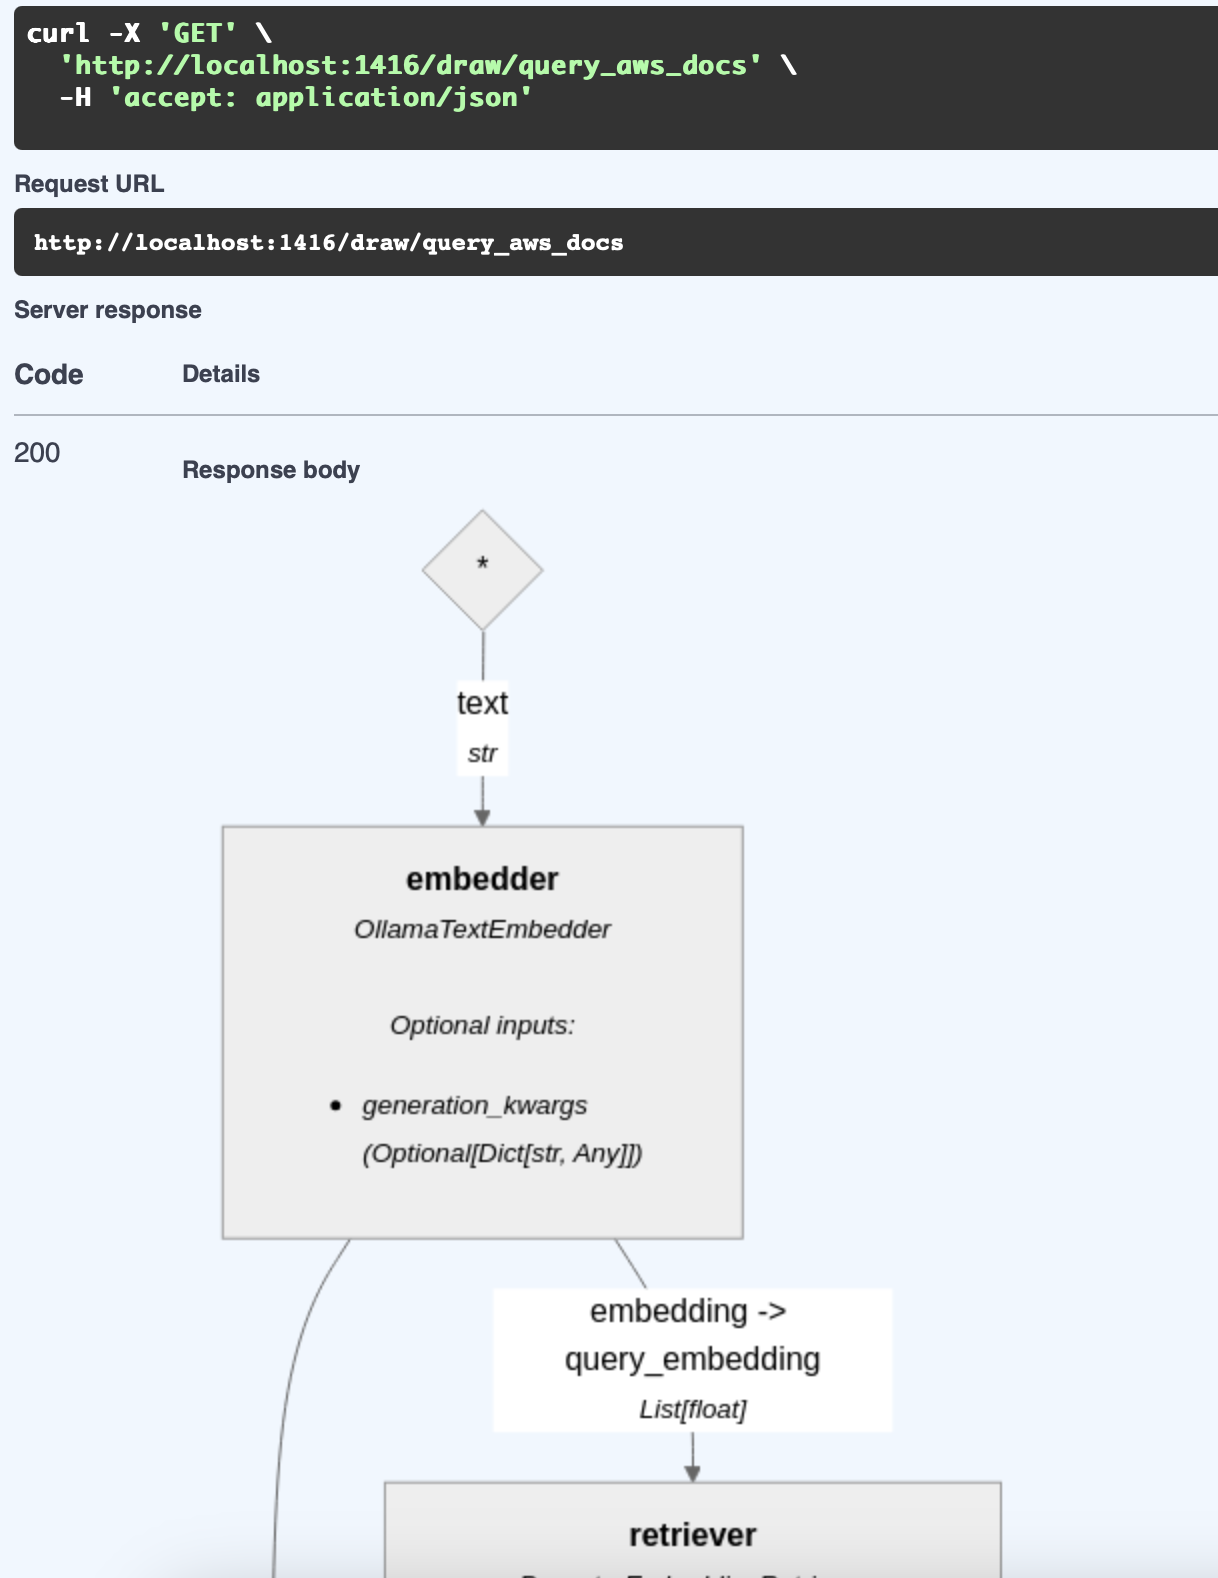
In my case, I'm using the following:
- OllamaTextEmbedder with
nomic-embed-textas the embedding model. - PgvectorEmbeddingRetriever with PgvectorDocumentStore as the document store.
- The Open WebUI Documents prompt.
- OpenAIChatGenerator with Gemini 2.0 Flash Lite.
There's lots of options for choosing the right embedder, but honestly if I have to do more with this I would probably go with the hybrid approach and pick OpenSearchEmbeddingRetriever and OpenSearchBM25Retriever before I started messing with embedding models.
Indexing the AWS Documentation
There still remains the problem of indexing the AWS documentation for search. This is where HayHooks comes in with an indexing pipeline.
We assume for the purposes of the indexing pipeline that the documents are already downloaded and converted to Markdown. Using HayHooks, we can upload files from the command line or call the REST API directly.
Again, the pipeline is conceptually very simple:
class PipelineWrapper(BasePipelineWrapper):
    def setup(self) -> None:
        document_store = create_document_store()
        markdown_converter = create_markdown_converter()
        document_cleaner = create_document_cleaner()
        document_splitter = create_document_splitter()
        document_embedder = create_document_embedder()
        document_writer = create_document_writer(document_store)

        pipe = Pipeline()
        pipe.add_component(instance=markdown_converter, name="markdown_converter")
        pipe.add_component(instance=document_cleaner, name="document_cleaner")
        pipe.add_component(instance=document_splitter, name="document_splitter")
        pipe.add_component(instance=document_embedder, name="document_embedder")
        pipe.add_component(instance=document_writer, name="document_writer")

        pipe.connect("markdown_converter", "document_cleaner")
        pipe.connect("document_cleaner", "document_splitter")
        pipe.connect("document_splitter", "document_embedder")
        pipe.connect("document_embedder", "document_writer")

        self.pipeline = pipe

    def run_api(self, files: Optional[List[UploadFile]] = None) -> dict:
        # elided for brevity
As far the pipeline implementation goes:
- Split the text into chunks using RecursiveDocumentSplitter.
- Embed the chunks by running them through OllamaDocumentEmbedder.
- Store the chunks in PgvectorDocumentStore.
There's some additional complexity involved because the AWS documentation is too large to do at once (FastAPI can only handle uploading 1000 files at a time), and different document repositories get updated at different times – I'm indexing one project at a time and putting them in different tables to keep it managable.
Download and Conversion
In order to index markdown documents, there must be markdown documents. This is actually the easy part.
- Download the AWS documentation using awsdocs.
- Convert the HTML to Markdown using pandoc, although ReaderLM-v2 would have been cooler.
- Store the HTML and generated Markdown in Git.
Storing the raw documents in Git allows for diffing and versioning between snapshots, and gives me something to fall back on if I've munged a conversion completely.
RAG Evaluation
After putting together a RAG, you're supposed to evaluate it. I have the good fortune of a pre-existing dataset of AWS questions and answers. I'm not sure I really want to go that far, but I may pick a few answers out just to spot check.
RAG in a Box
If you want to set up a RAG project like the one I've just mentioned, there is a pre-built docker compose project on Github that uses RAG Application with Haystack, React UI, OpenSearch, and OpenAI at haystack-rag-app.
Open WebUI Integration
One nice thing about HayHooks is that it's OpenAI compatible. If I don't want to use Letta and just want a streaming response ASAP, I can implement run_chat_completion and use the OpenAI endpoint to chat directly with Open WebUI.
Just add this to your pipeline:
 def run_chat_completion(self, model: str, messages: List[dict], body: dict) -> Union[str, Generator]:
        log.trace(f"Running pipeline with model: {model}, messages: {messages}, body: {body}")

        question = get_last_user_message(messages)
        log.trace(f"Question: {question}")

        # Streaming pipeline run, will return a generator
        return streaming_generator(
            pipeline=self.pipeline,
            pipeline_run_args={"fetcher": {"urls": URLS}, "prompt": {"query": question}},
        )
There's a docker compose that you can run that comes pre-configured with Open WebUI if you just want to try it out.
Future Directions
Now that I know how to implement RAG, there's really nothing stopping me doing more of it. A bunch of what I want to do is learn more effectively.
There's a lot of other things I could do:
- Add PDFs of manuals and academic papers with pyzotero and Docling.
- Transcribe podcasts using the audio API.
- Chuck in all the HOWTOs, tips, and random notes that get scattered around the place.
- Throw in a bunch of Youtube transcripts of conferences.
- Add citations to the RAG with confidence scores and retrieval timestamps.
- Integrate Letta's memory system into searches for context-aware retrieval.
- Accumulate knowledge by scraping smart people's blogs and keep track of new projects and technologies without having to crawl social media or Reddit.
But more importantly, I know that RAG isn't hard. It's really just another ETL job that you can implement in two shellscripts with Ollama and SQLite – the only bits that are strange are the embedding models, and they are all good enough not to matter too much.